


One of the truly beautiful things about the HoloLens is its completely untethered, the-world-is-your-oyster freedom. This, paired with the ability to view your real surroundings while wearing the device, allows for some incredibly interesting uses. One particular use is triggering events when a user enters a specific location in a physical space. Think of it as a futuristic automatic door.
In this tutorial, we will be creating a simple location-based trigger, or hotspot, to change the color of a GameObject when activated. This will consist of setting up the camera, a hotspot, and an object to apply the event action to.
This tutorial assumes you already have a HoloLens project set up and ready to go. If not, follow along to our quick getting started guide. For reference, I'm using a HoloToolkit version pulled from GitHub on March 2017.
Set Up the Camera
First, let's add a collider to the "HoloLensCamera" object. You can do this by selecting the object in the Hierarchy window in Unity. Then, in the Inspector, click "Add Component" and type "sph c" in the search bar. This will surface to the top the Sphere Collider. Click on "Sphere Collider" or press Enter.
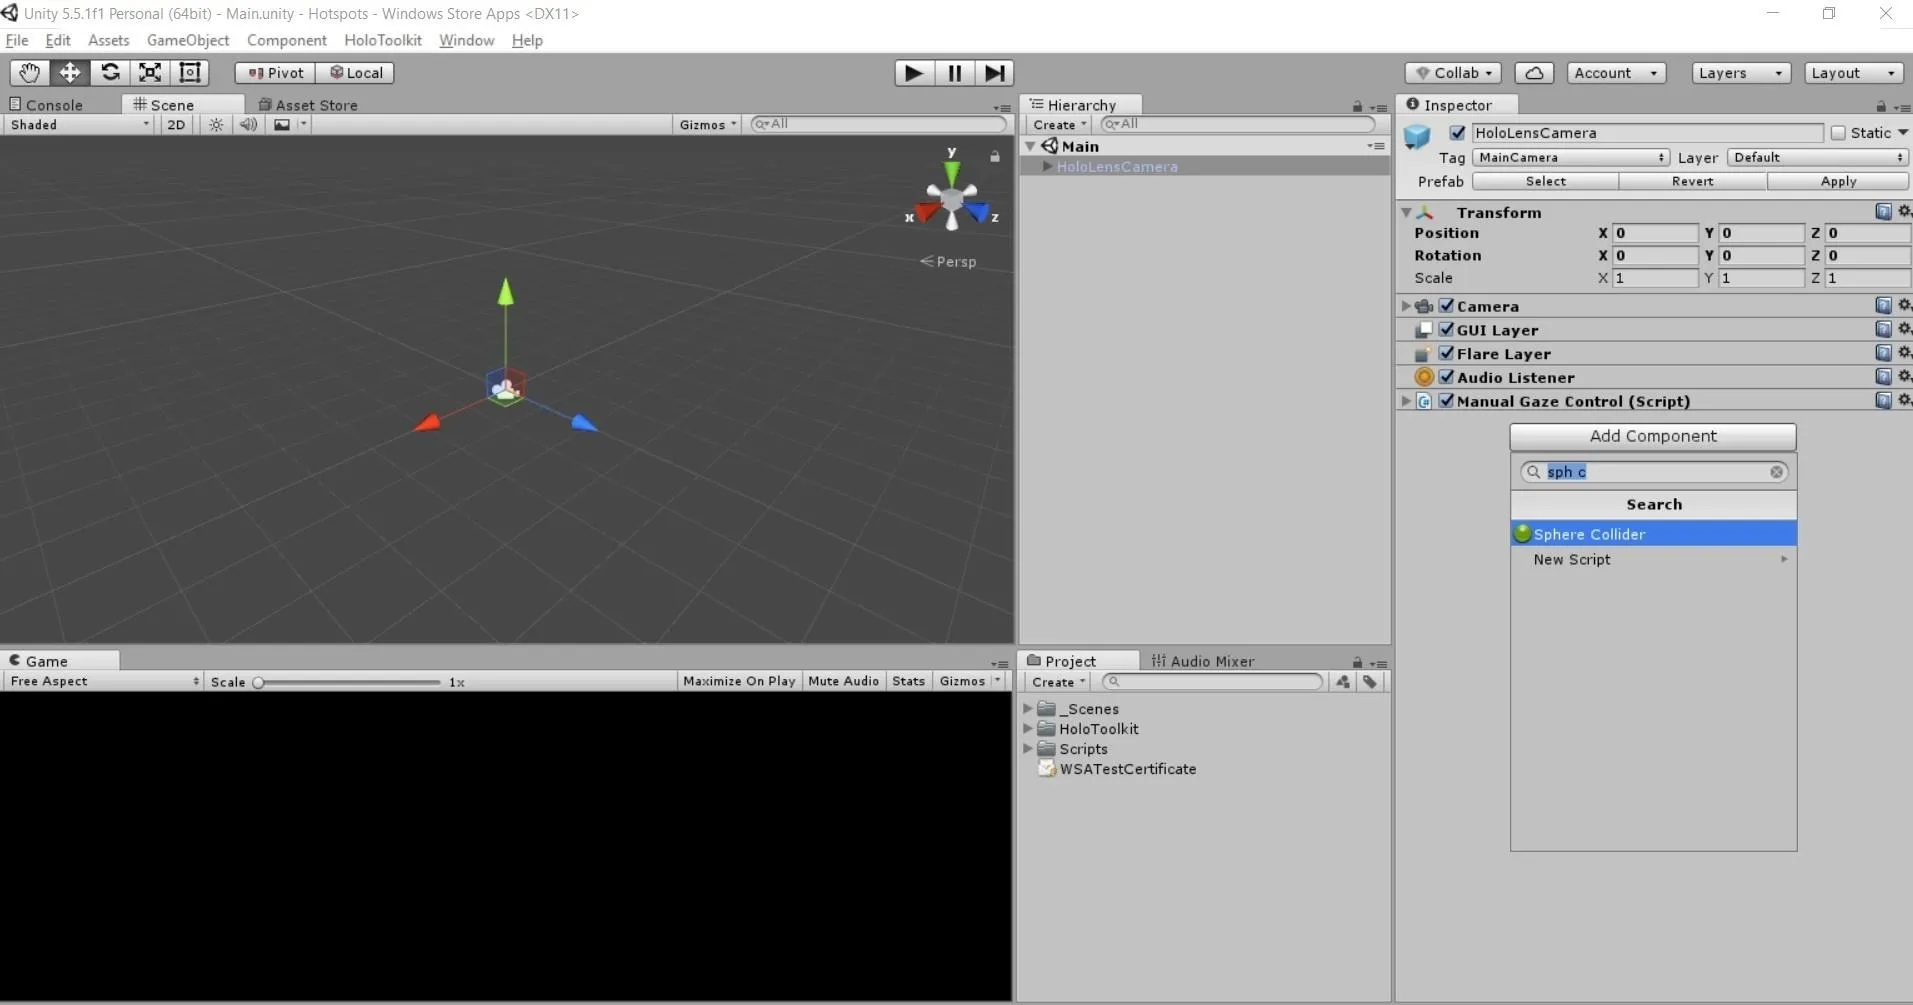
I'll be using a sphere-shaped collider for this as I've found it to be effective for most scenarios while maintaining simplicity. You can experiment with adding children with colliders to the camera to more accurately guess a user's full body position. However, this opens up many complexities as we don't know whether users are standing or sitting, and determining whether they are looking up or down is beyond the scope of this tutorial.
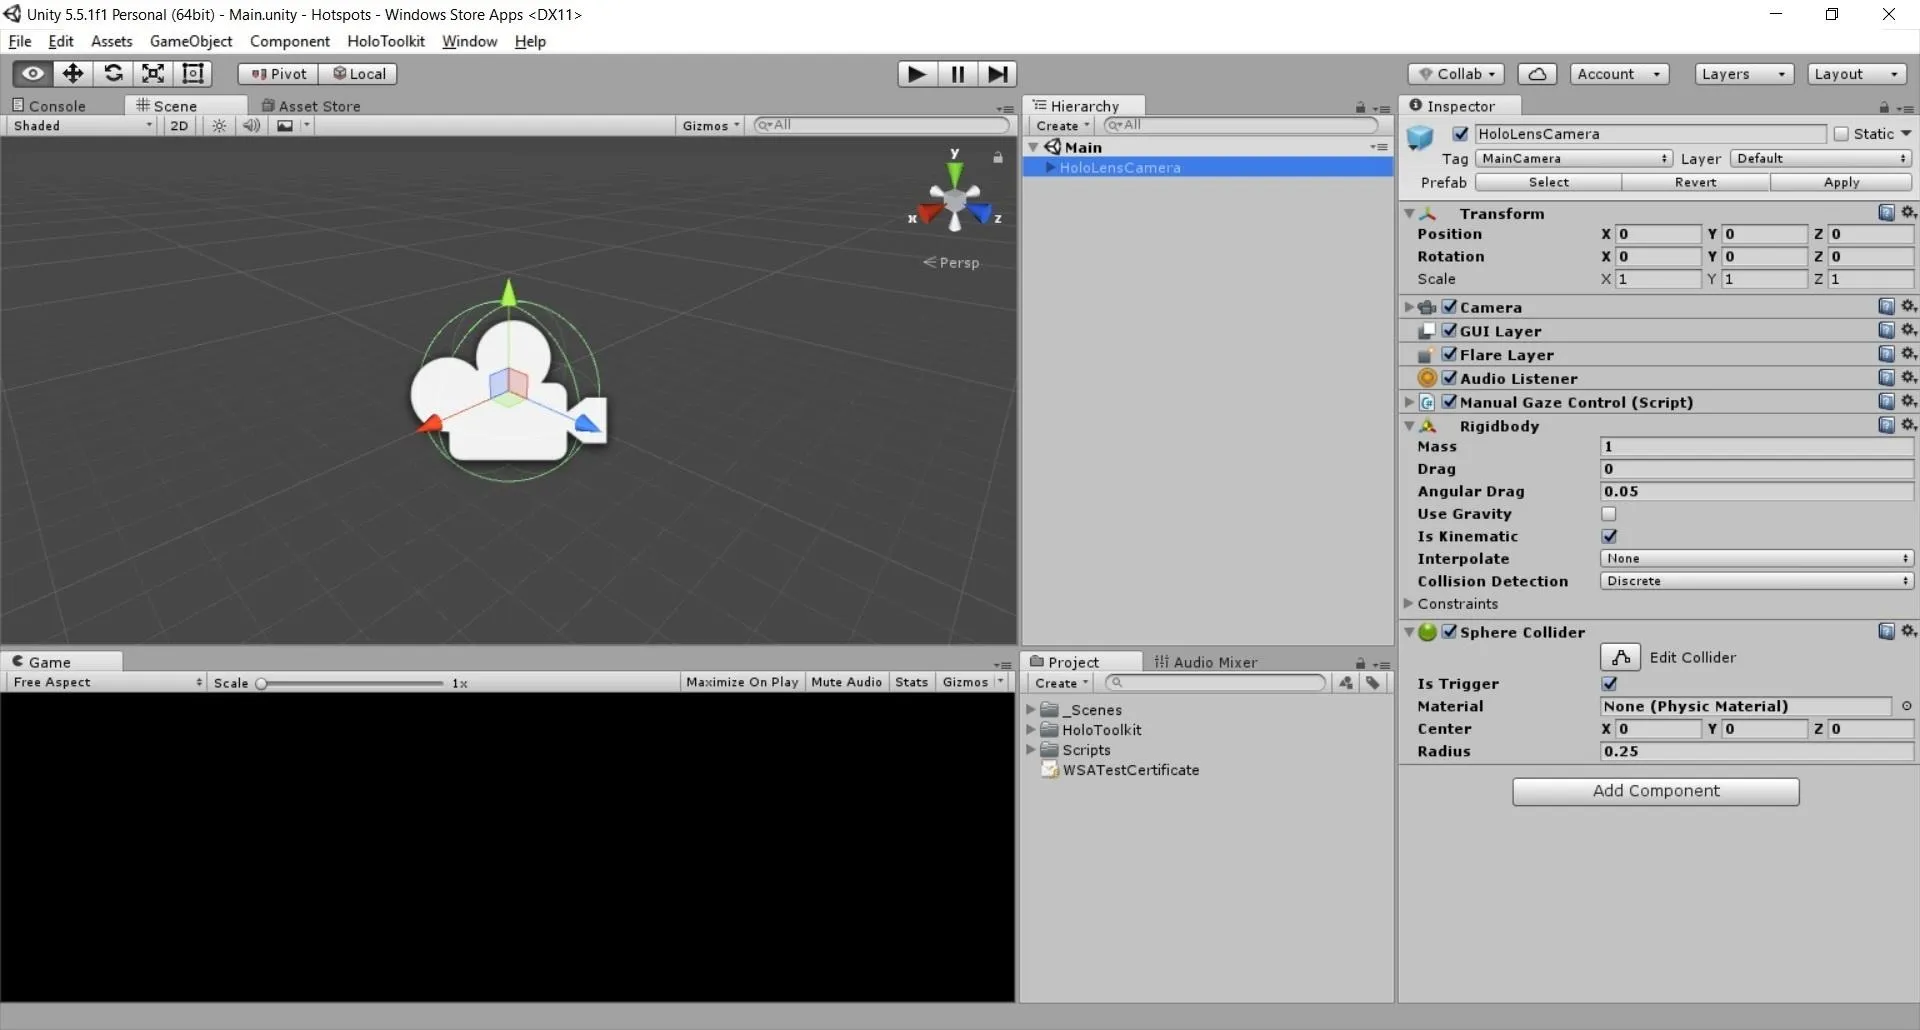
Once the Sphere Collider is added, check the Is Trigger box. This will prevent our camera from being jarred loose if we pass through "solid" holograms. We can also set the Radius to 0.25. This will tighten up the collider to prevent inadvertent triggering and will give us more flexibility when setting up "triggers zones."
Next, we'll want to add a Rigidbody to the camera. Since the camera is a moving object with a collider, we'll want to follow best practice for performance and make it a dynamic collider by adding a Rigidbody. You can and should read up more about colliders in the Unity docs.
Back in the Inspector, click "Add Component," then type "rig" and press Enter. Check the Is Kinematic box. This will ensure the camera does not react to the physics engine. For housekeeping purposes, deselect Use Gravity.
If you are using the "HoloLensCamera" prefab with the attached "ManualGazeControl" script attached, go ahead and play the scene. You should be able to drive the camera around with your keypad. Check to make sure the collider follows and that the camera doesn't drop into the abyss.
Create a Hotspot
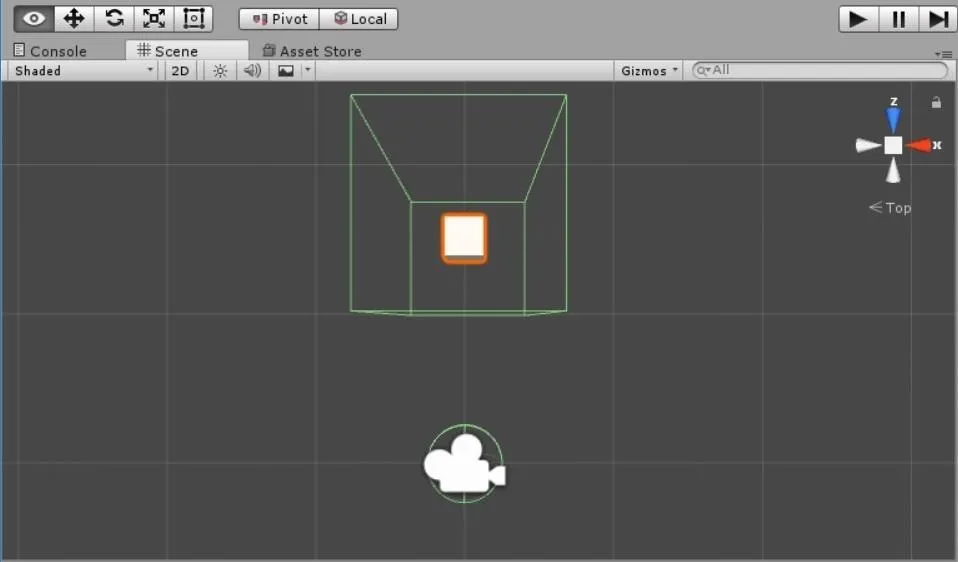
Now we will be creating the hotspot that will fire an action when the camera passes through its trigger zone. For this, start by creating a "Cube" and setting its Position to (0, 0, 1.5) and its Scale to (0.25, 0.25, 0.25).
A Cube already has a Box Collider attached. Let's make a couple of adjustments to the default values. For your own project, you may want these hotspots to react to physical collisions, but for our example, we will disable by checking the Is Trigger box. Next, while we want the trigger zone to be large enough to actually trigger events, we don't necessarily want to render the entire zone. For this, we will be adjusting the Box Collider's Size to (4, 8, 4). With the Cube's current scale, this will create a 1 by 2 by 1 meter zone.
In the event you may want this object to move at some point, let's add a Rigidbody component. Again, deselect Use Gravity and check Is Kinematic.
Create the Hotspot Script
Now we can create the short script that will bring this hotspot to life. For this, we will be using events to create a simple dynamic broadcast system. This will provide a good base to build from and offer plenty of flexibility while keeping our code decoupled.
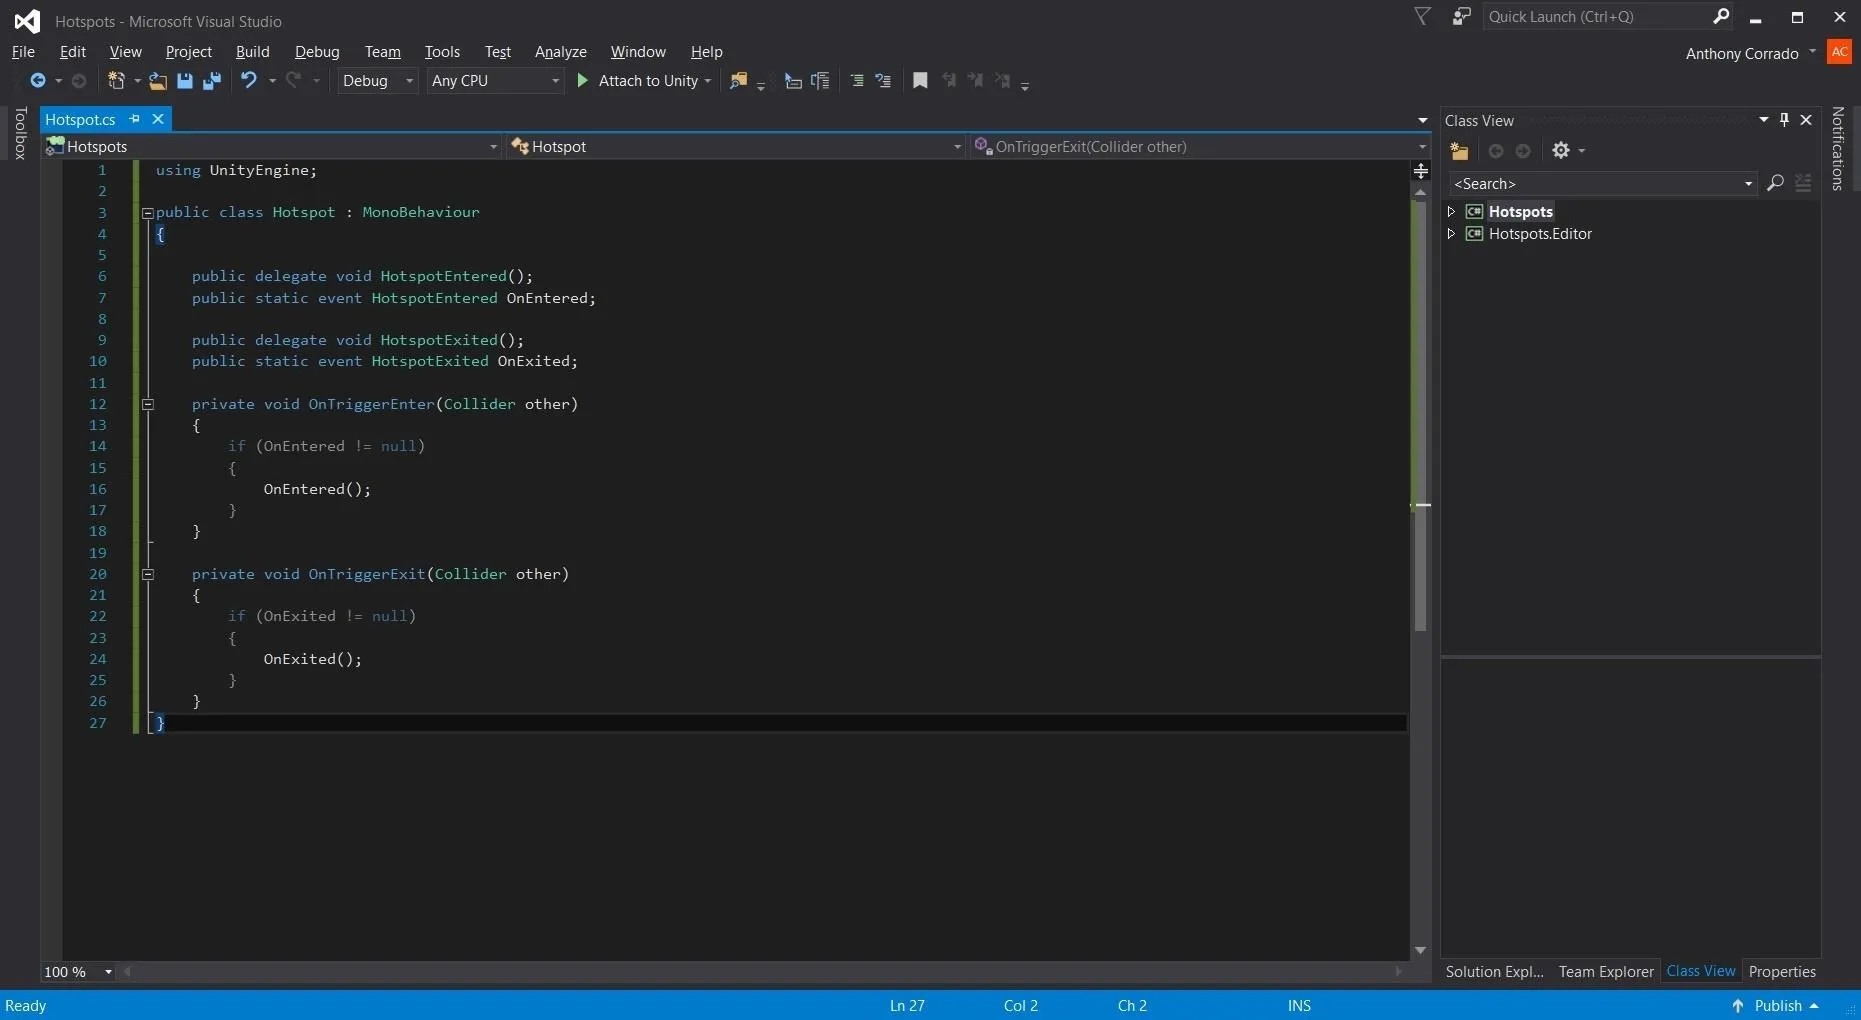
First, add a script component named "Hotspot" to the Cube object. Open it up in your preferred IDE and paste in the code found here.
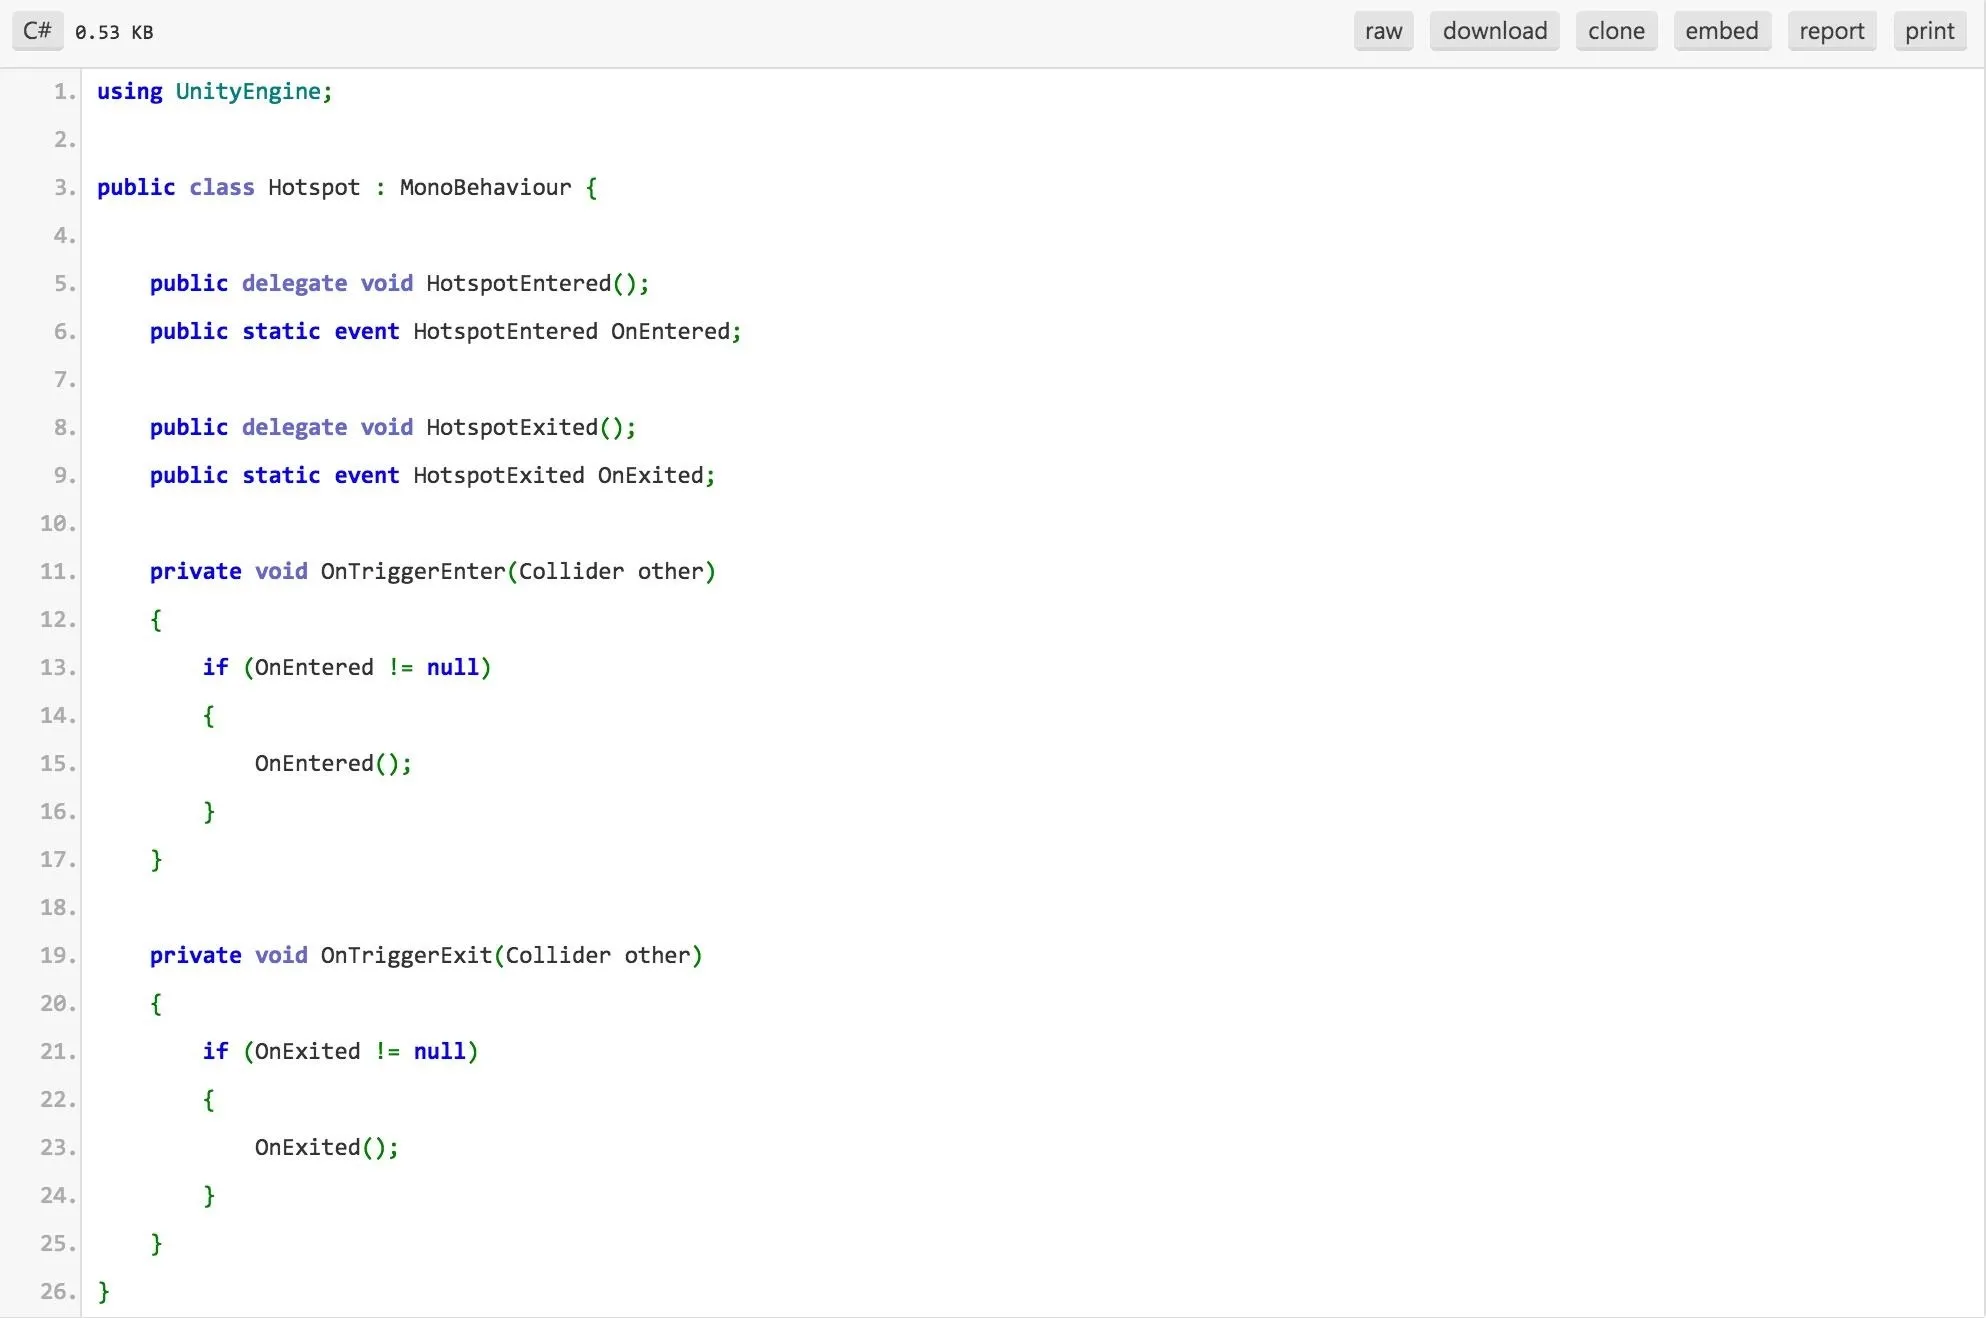
Looking over the code, you see we create a delegate type and name it "HotspotEntered". Then we create the event variable based on our delegate and name this "OnEntered". We want this to be a public static variable so we can use it outside of its class without needing a new instance.
We want to invoke the event when our hotspot is triggered. Since we have Is Trigger selected, we use the "OnTriggerEnter" built-in function. We also want to ensure we have subscribers to this event, otherwise, an error will be thrown. To do this, we check for a not null condition. If this is satisfied, we invoke the event.
This is a good time to check if our triggers and colliders are set up properly and doing their thing. Add a Debug.Log in the OnTriggerEnter function above the if statement. Save and play the scene. Upon moving the camera through the Cube's collider we should see our log in the Console!
Great job. The final part to the hotspot script is to create an event when a trigger is exited. Follow the same steps as the enter trigger, but use the "OnTriggerExit" built-in function and relevant naming.
Subscribe to the Event
We have the hotspot all ready to fire some actions! Let's create an object to receive the event broadcast and do something with it.
Start by creating another primitive. This time, we'll use a Sphere. Set its Position to (0, 0.5, 3) and Scale to (0.5, 0.5, 0.5). Go ahead and add a new script component called "HotspotColorChanger". Paste in the code found here. This script is a modified version of the HoloToolkit's "FocusedObjectColorChanger" script.
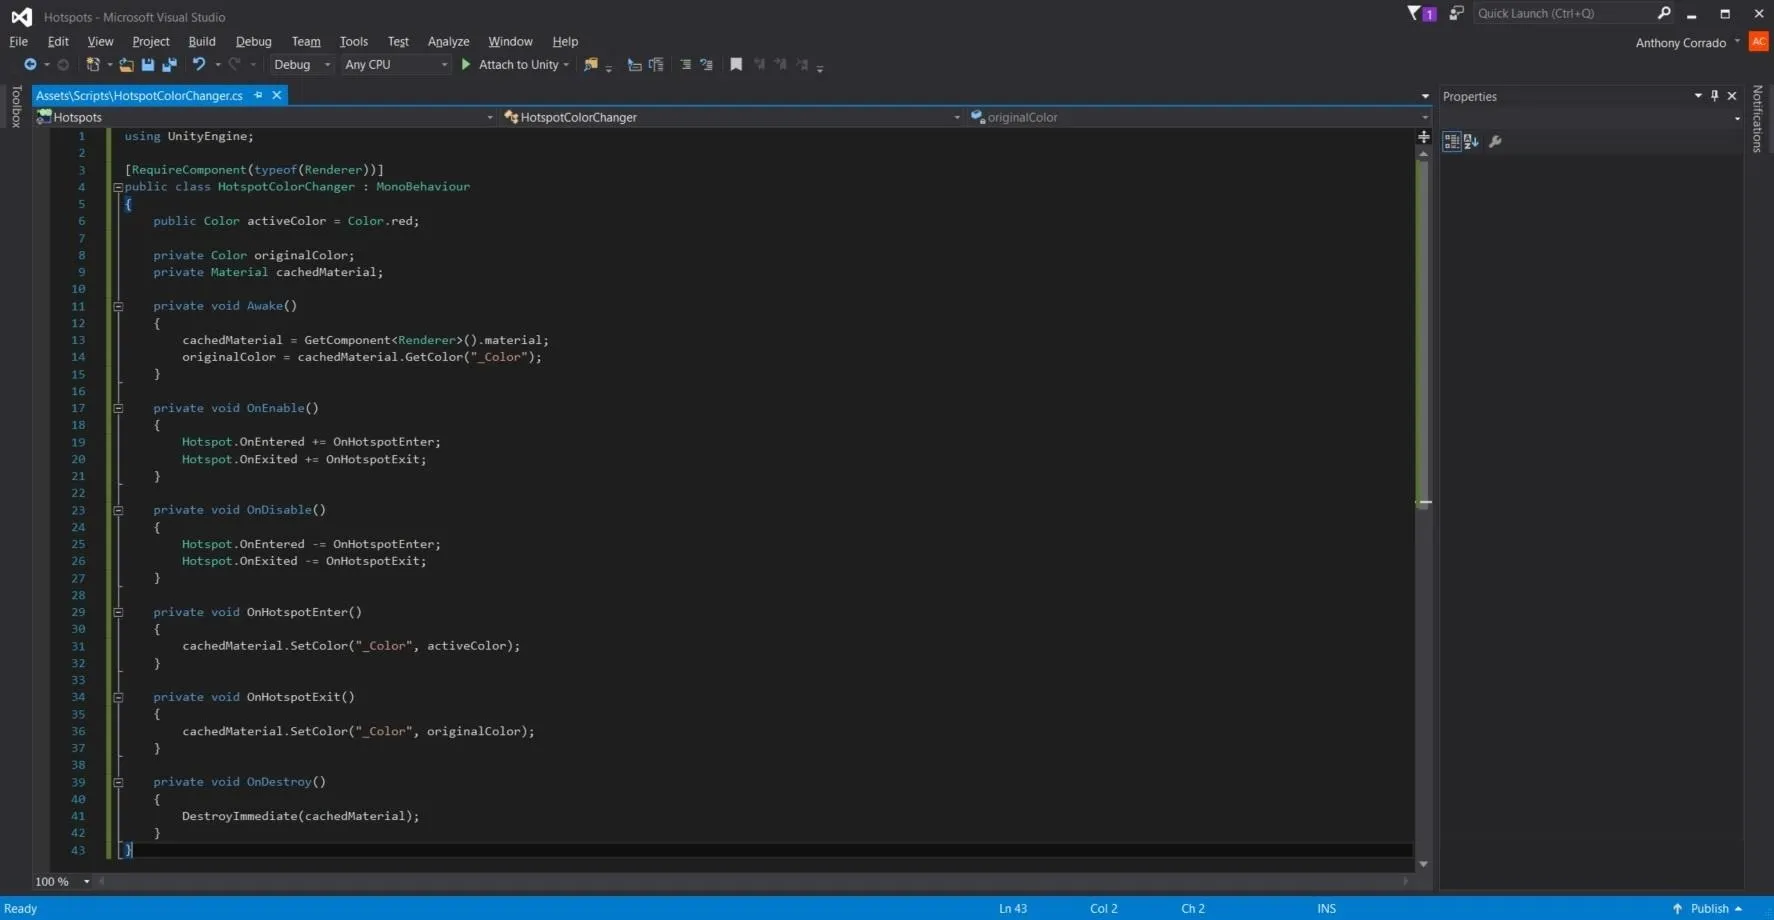
The "RequireComponent" attribute does a few nifty things that will prevent errors and give you pop-up alerts in Unity if you attempt to attach this script to a GameObject that does not have a Renderer component.
Next, we grab the initial color of the object for referencing back to later as well as the activated color chosen via the Inspector.
We subscribe to the events in the "OnEnable" function using the format—Class.Event += functionToCall. It is critical to unsubscribe from events whenever we disable or destroy the associated object to prevent memory leaks and whacky behavior. We do this in the "OnDisable" function using the same format as above, but using "-=" instead—Class.Event -= functionToCall.
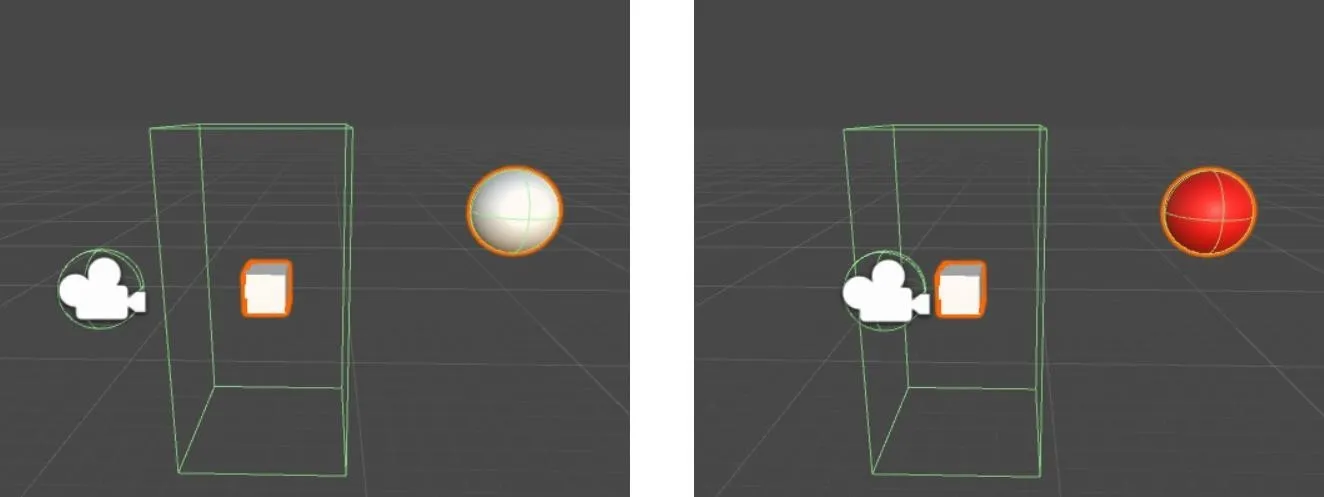
The last thing we need to do is something useful when our events fire. Referencing the function names from our subscriptions, we build out the body of these functions. When "OnHotspotEnter" is called, we set the material color to our default "activeColor" or one specified in the Inspector. When "OnHotspotExit" is called, we simple reapply the original GameObject color.
Okay, give a quick test in Unity. All should be well. If so, deploy to your HoloLens or emulator and watch the magic happen as you walk up to your hotspot!
Now that the basics are done, you can really scale up this feature. Any number of GameObjects with custom scripts and behaviors can subscribe to the hotspot event. The hotspot event can also be made into a robust event system with multiple hotspots triggering multiple events. These hotspots can also be hidden by disabling the MeshRenderer to really create a magical experience.
Well folks, that will wrap up this hotspot tutorial. While this was a simple example of what can be done, the real fun and excitement happens when getting creative with this concept. Instead of changing a GameObject's color, the hotspot can make a REST request and change the color of your real-world Wi-Fi enabled lightbulbs. Perhaps, implemented into a interactive story, the AI narrator can help you navigate a treacherous augmented path. How about a musical rhythm game that challenges the wearer to a uptempo workout?
We would love to see what you build or have built using hotspots. Please share, along with any questions, feedback, or development quirks you'd like to learn about in the comments below. Cheers!


Comments
Be the first, drop a comment!