


Now that we've got all of our software installed, we're going to proceed with the next step in our HoloLens Dev 101 series—starting a fresh project and building it into a Holographic application. Then we will output the application to the HoloLens Emulator so we can see it in action.
For some newcomers, too much information too early can often be a hindrance, and is better grasped later after you've gotten a chance to play around a bit. So the primary goal in this guide is instant gratification. I want to get you in and out of the building process as fast as possible. Aside from Steps 5 and 6 below, these are the minimal steps required to get a rough project started.
We will be using Unity, one of the easiest ways to get started with 3D application development, but don't get hung up on all of the options and tools you see available. Like I said, we want to get you in and out right now. My next guide in this series will be on the basics of the Unity interface, so you'll be able to grasp it better then.
If you learn better from video instructions, make sure to check out our video above. Either way, the written instructions below can help aid you through the process.
Create the Unity Project
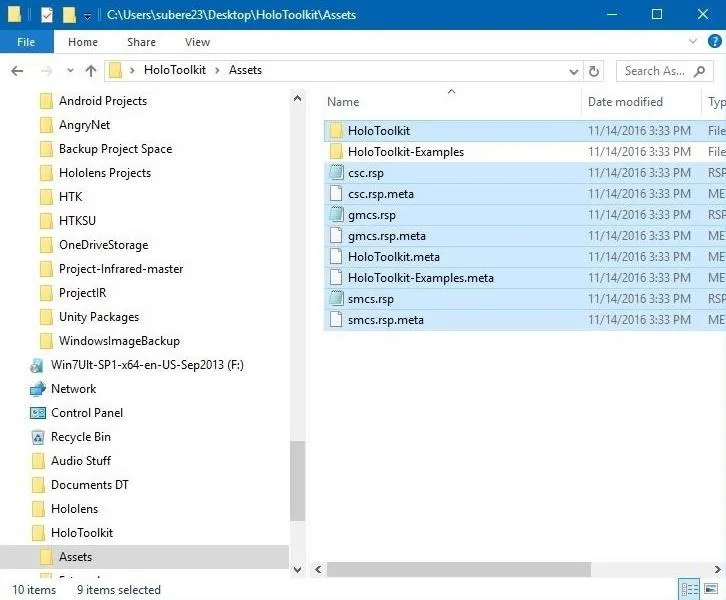
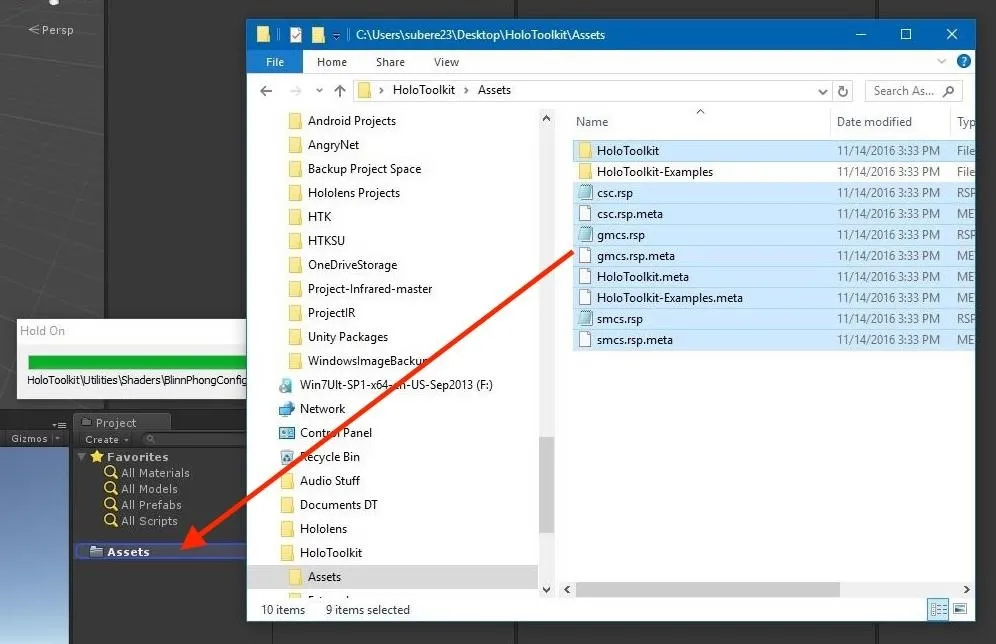
Assuming you followed my tutorial in this series on setting up the software, you should have a folder on your desktop with the HoloToolkit in it. Open that folder up, then double-click on Assets and you should see a bunch of files inside. Using your Control key, select everything but the "HoloToolkit-Examples" directory.
Now open up Unity, then click on the "New" button on the Project selection screen.
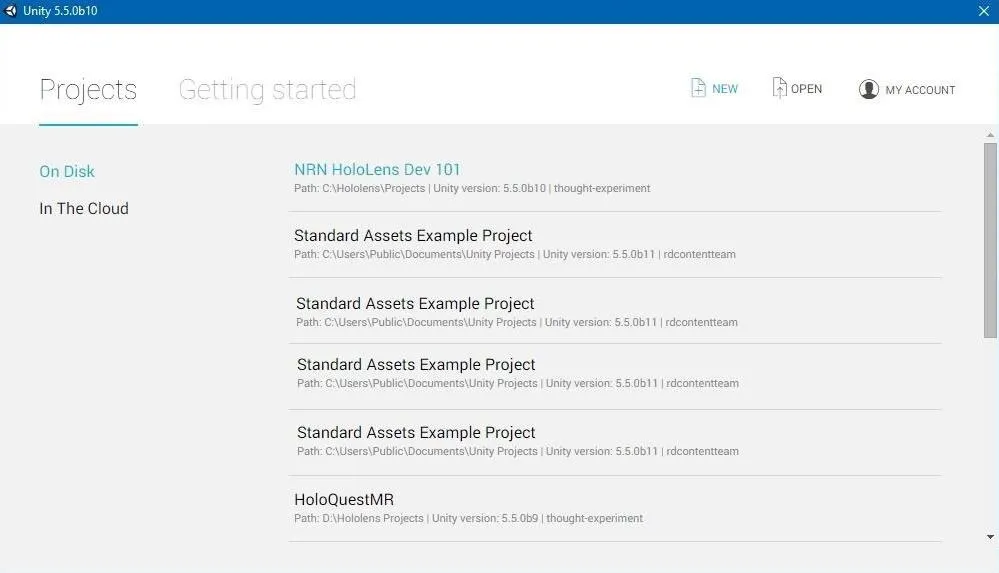
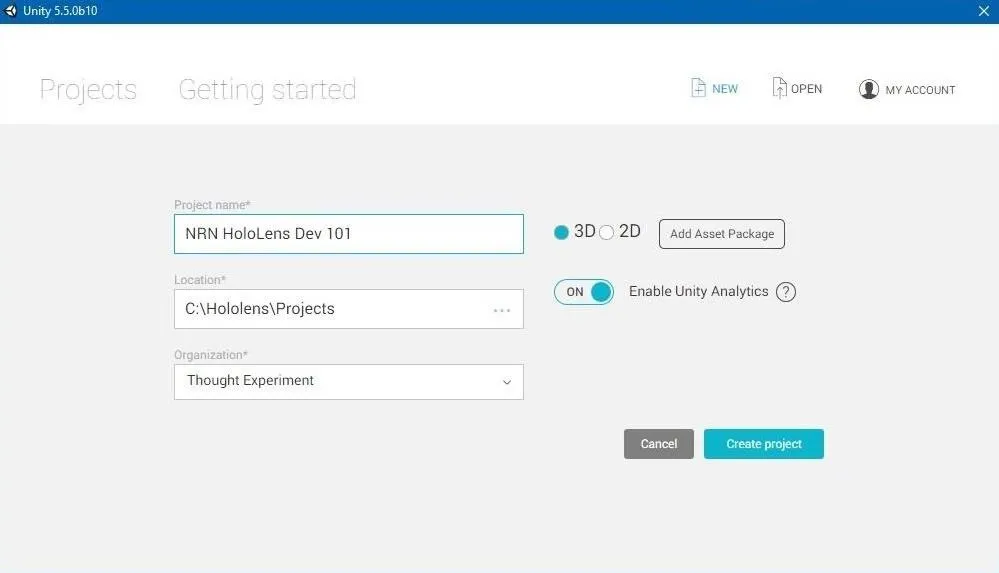
In the name field, type NRN HoloLens Dev 101 and click on "Create project." You can, of course, use a different name if you want to, but it might cause some confusion down the line.
Install the HoloToolkit in Your Project
First, let's bring the HoloToolkit into Unity by hitting Alt + Tab to bring the window with the HoloToolkit assets ready for us. We should see our selection from Step 1 still highlighted.
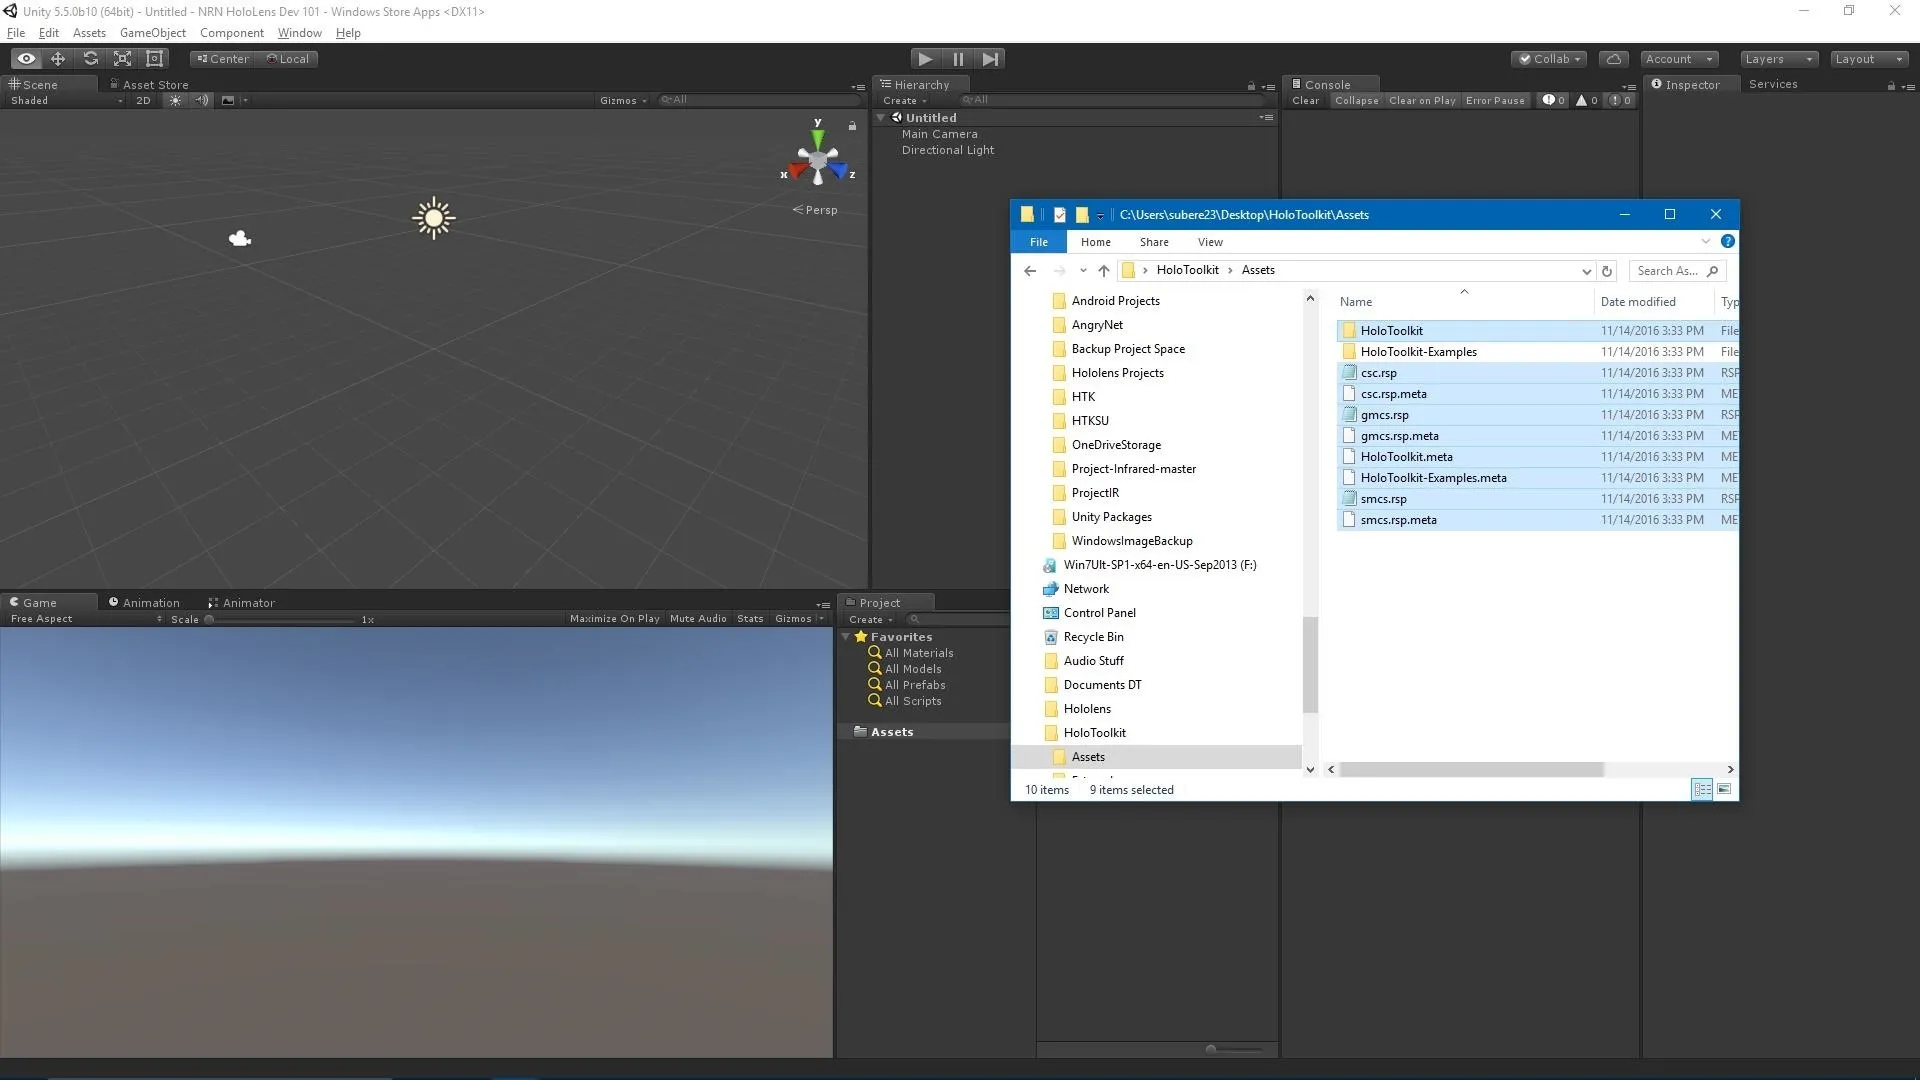
Now drag it onto the Assets directory in the Project window. After a few moments, all of those files will be copied into Unity.
Note: Sometimes you will get a few errors in the console after this process, but you can just hit the "Clear" button.
Set Up the HoloToolkit
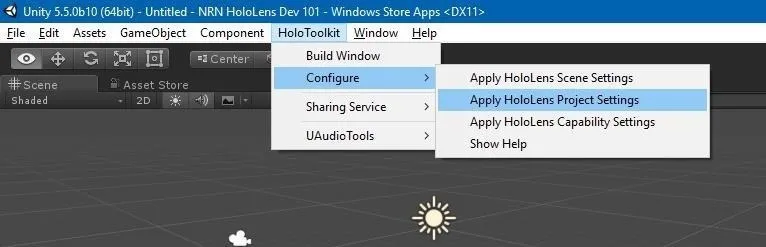
It's time to use our newly acquired HoloToolkit menu. Here we will set up our new project with all of the settings necessary for Unity to build its player for the HoloLens. So go HoloToolkit in the main menu, click on "Configure," then select "Apply HoloLens Project Settings." Unity will need to reload to apply these changes, so do so when prompted.
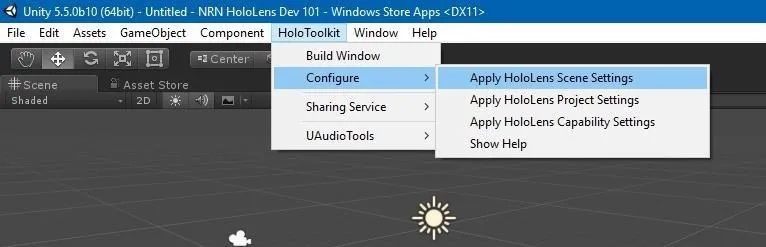
Next, using the same menu, select "Configure" and then "Apply HoloLens Scene Settings." These scene settings are HoloLens-specific camera and skybox components.
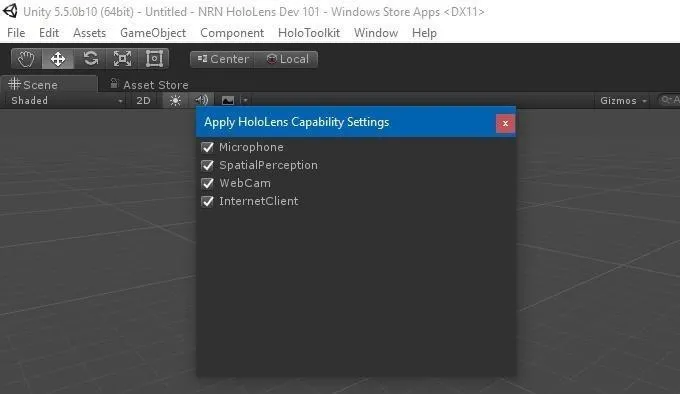
Go back to "Configure" once again in the HoloToolkit menu and choose "Apply HoloLens Capability Settings." A window will appear with four options—Microphones, SpatialPerception, WebCam, and InternetClient—make sure they are all checked. These turn specific features on for the HoloLens, so we can't get this working without them.
Save the Scene with the New Settings
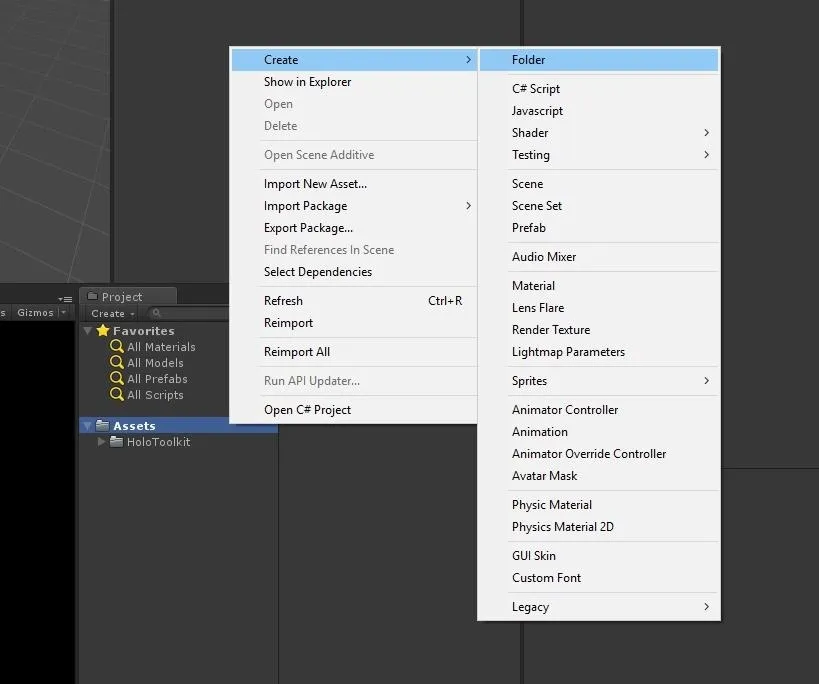
Now we need to save our scene so it will remember our changes. To do that, we need a place to save it, so let's create a folder by right-clicking on "Assets" in the Project window and selecting "Create," then "Folder." Simply name this new folder Scenes.
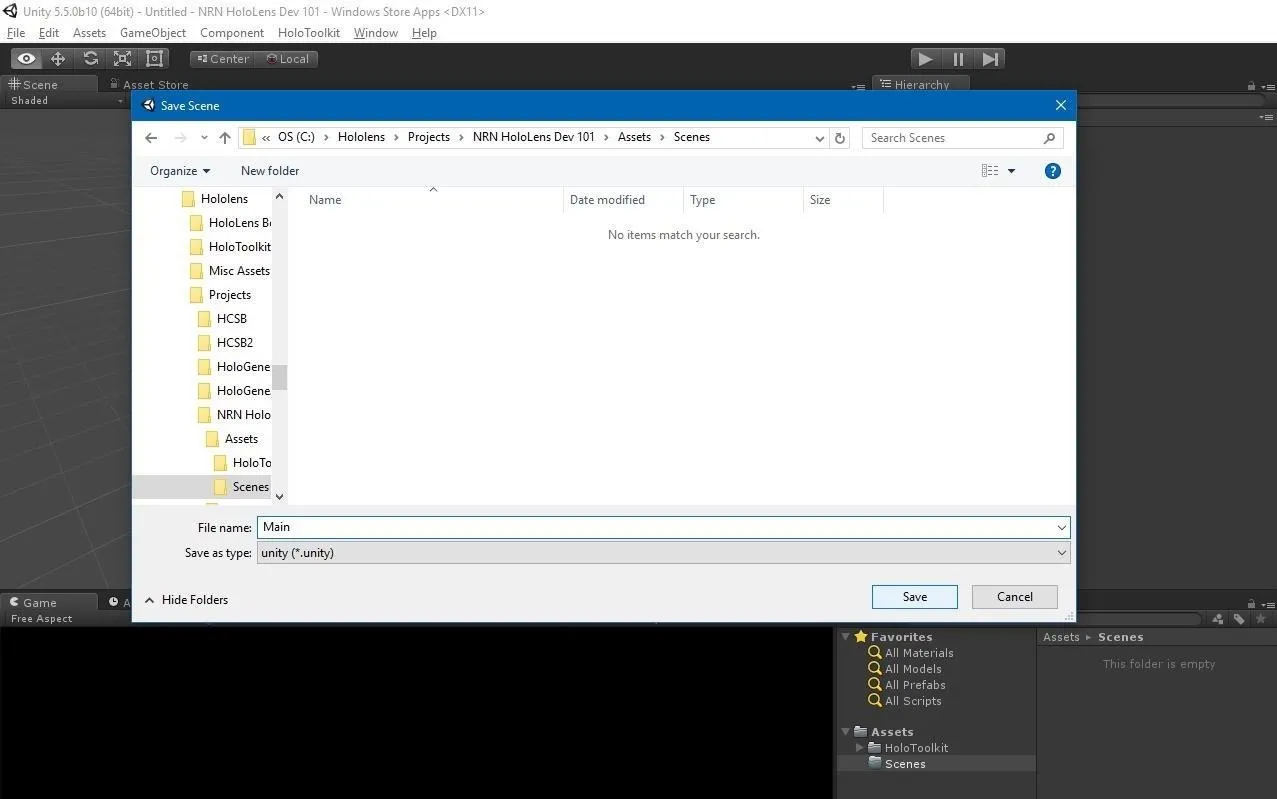
Now that we have our folder, in the main menu, go to "File," then "Save Scenes As." In the pop-up window, select your new Scenes folder, use Main as the file name, then hit "Save."
Create Objects in the Scene
In order to have something to look at instead of empty space, we are going to add some objects to the Scene window. Since we're only concentrating on getting set up fast in this guide, the objects won't actually do anything other than look pretty.
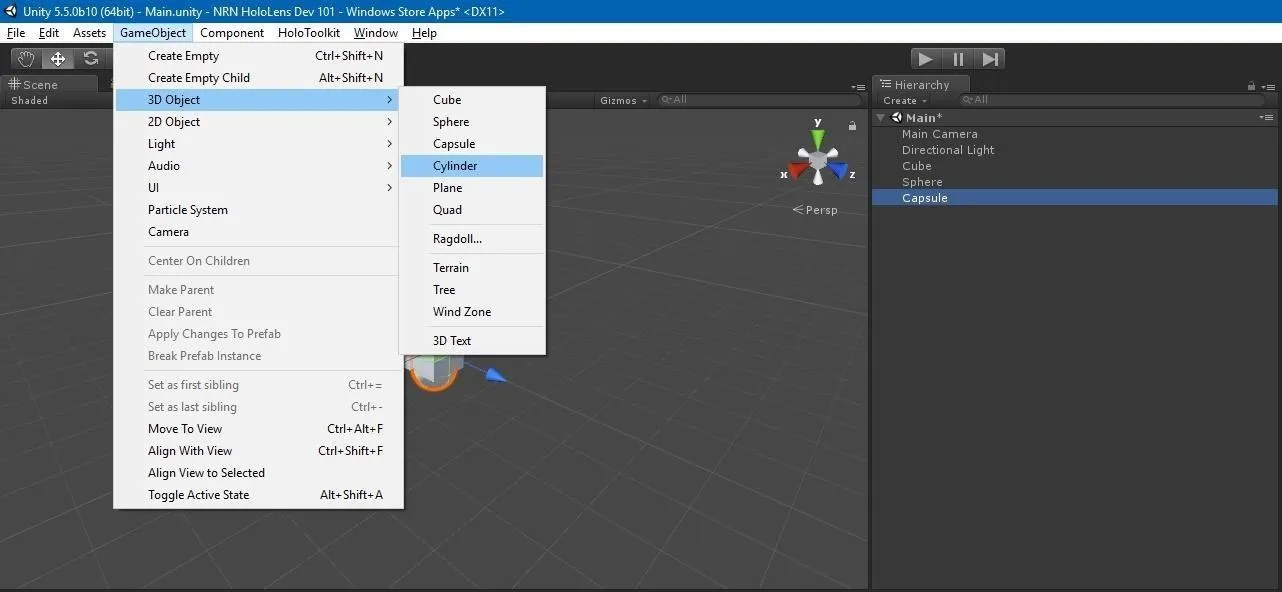
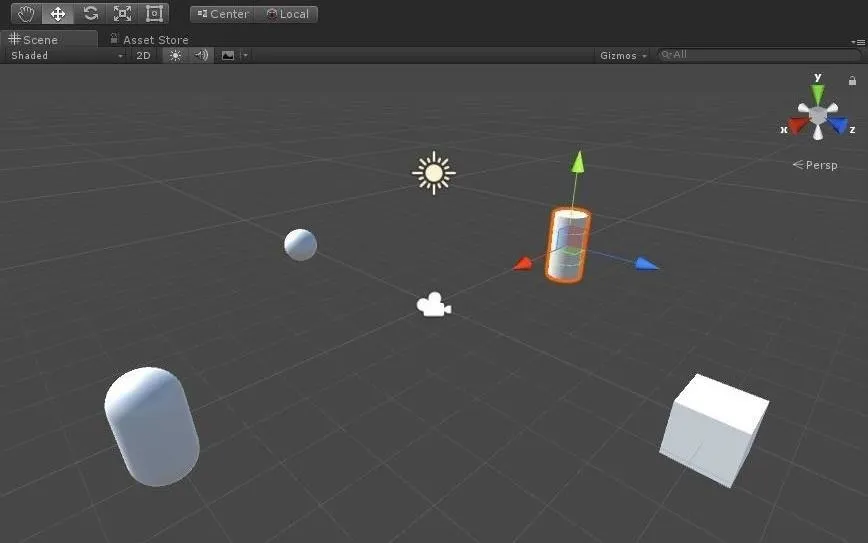
Go to the "GameObject" menu option, choose "3D Object," then select "Cube." This will give you a cube sitting in the center of the Scene window, and you'll also notice that "Cube" appears in the Hierarchy window. Now, repeat this process to add a Sphere, Capsule, and Cylinder object as well.
Position the Objects
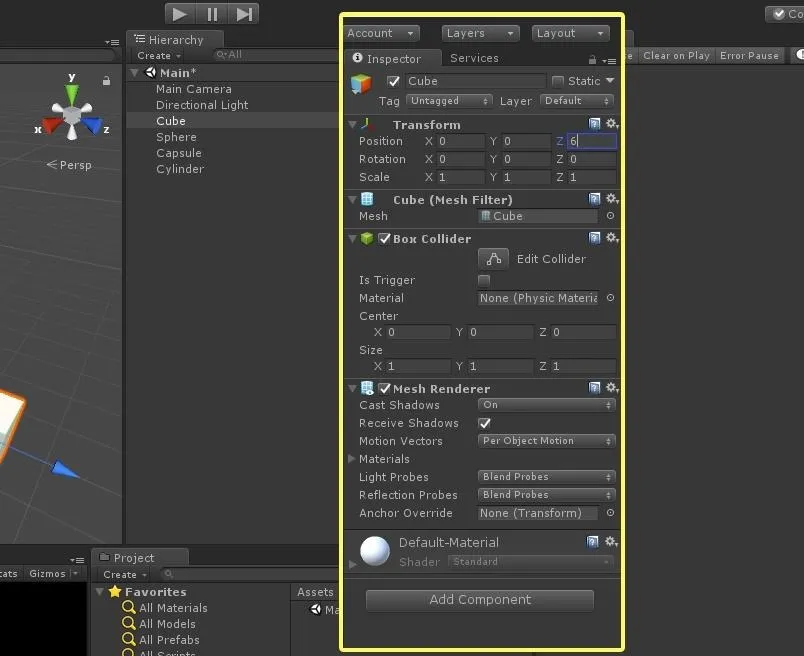
Like mentioned previously, we will go over the basics of Unity in our next guide, but for now, know that the Inspector window is a very important part of this interface. One component that is in the Inspector for every object in Unity is called "Transform," which details the position, rotation, and scale of each object.
In this step, we are going to change the positions of the objects we created. Currently, all four objects are sitting on top of the camera so we cannot see them, but we'll fix that.
In your Hierarchy window, select "Cube." Over in the Inspector, look at the Transform component and change its Z position to 6. We are going to repeat this process 3 more times for the other objects, but with different inputs for each.
Now select "Sphere" from the Hierarchy window and change its Z position to -6.
Do the same for "Capsule," but this time, set its X position to 6. Then, for the "Cylinder" object, make its X position -6.

This is what your Scene should look like now:
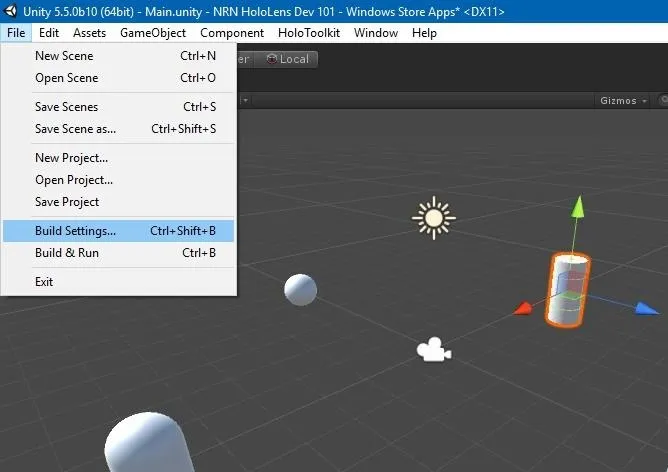
Build the Application
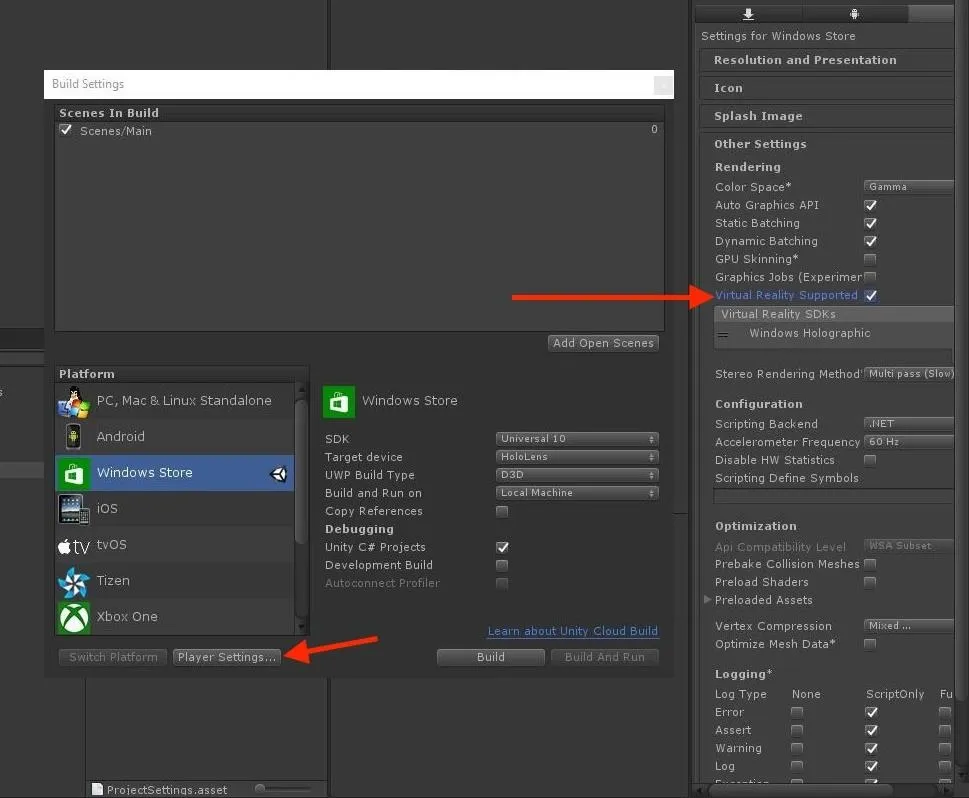
That's all we're going to do right now as far as the scene goes, so now it's time to build and compile it. Go to "File" in the main menu, then "Build Settings."
Click on the "Add Open Scenes" button to add the current scene to the list.
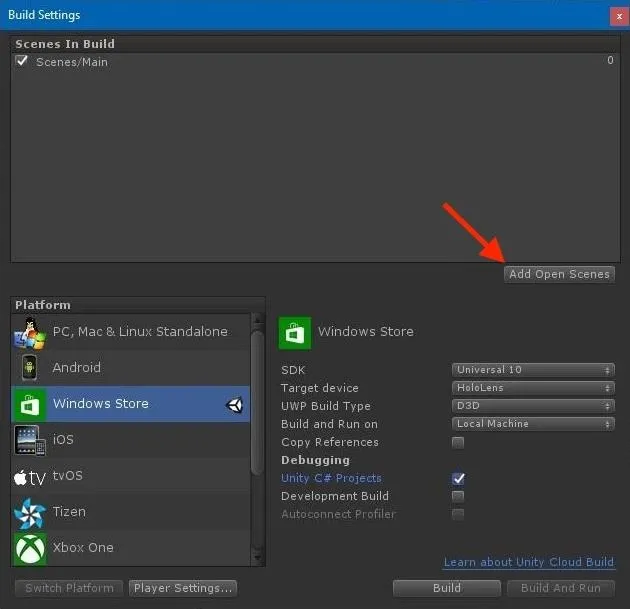
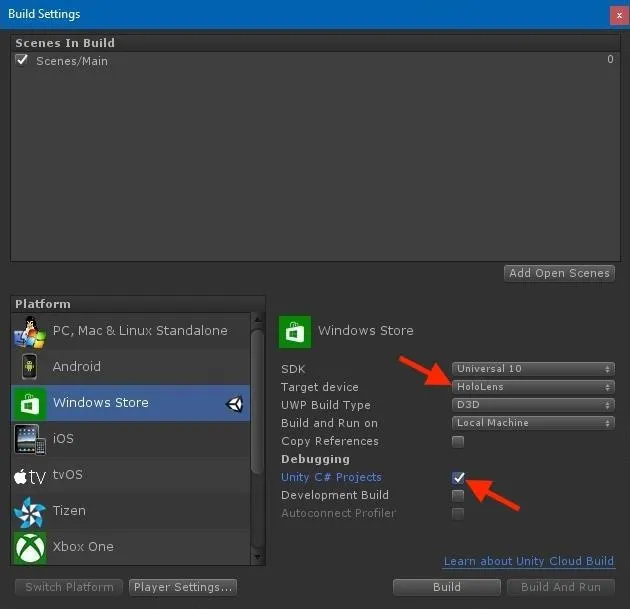
Choose "HoloLens" as the Target device and make sure Unity C# Projects is checked.
Now click on "Player Settings" and check Virtual Reality Supported in the Inspector. You should see the word Windows Holographic appear under the box to know it was done correctly.
Now just click on the "Build" button, then create a folder in Explorer called App. Highlight that folder, then hit "Select Folder" to continue.
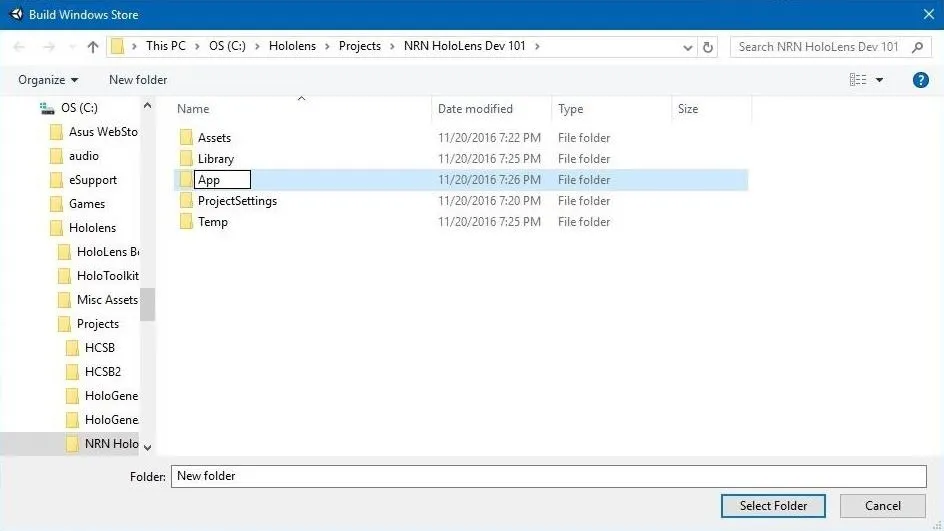
Now it will go through the build process.
Load the Project into Visual Studio
When the build process is done, a Windows Explorer window will pop up—this is our main project folder. Open up the new "App" folder, then double-click on the "NRN HoloLens Dev 101.sln" file. This will load our project into Visual Studio.
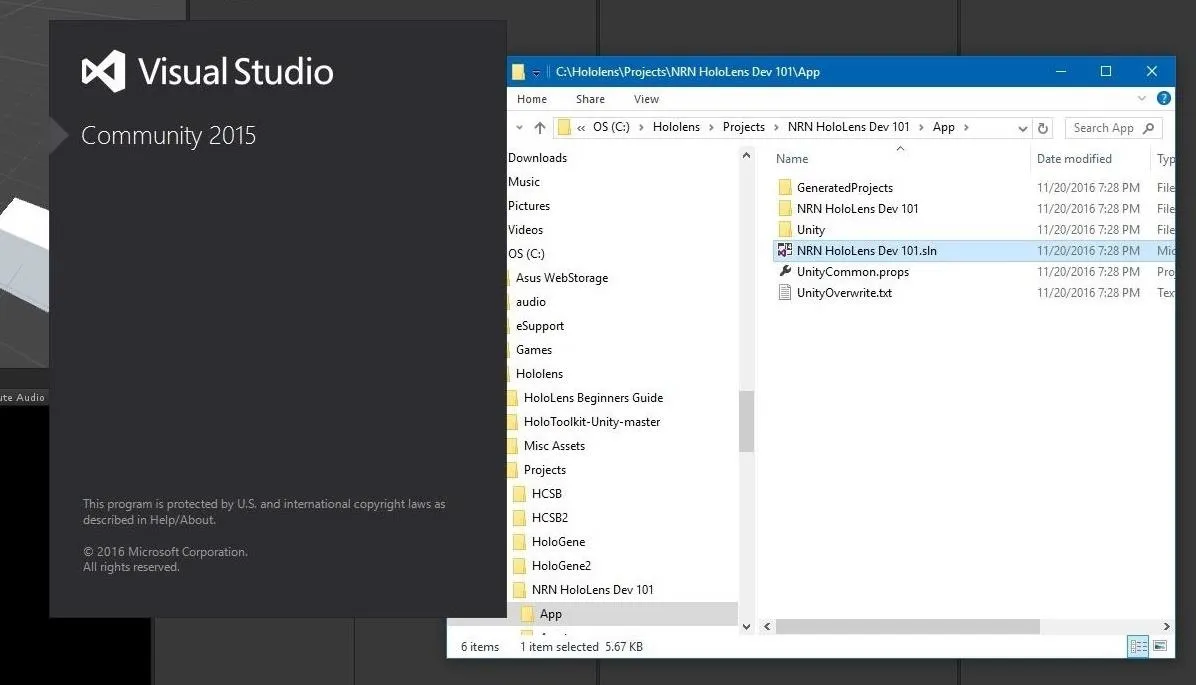
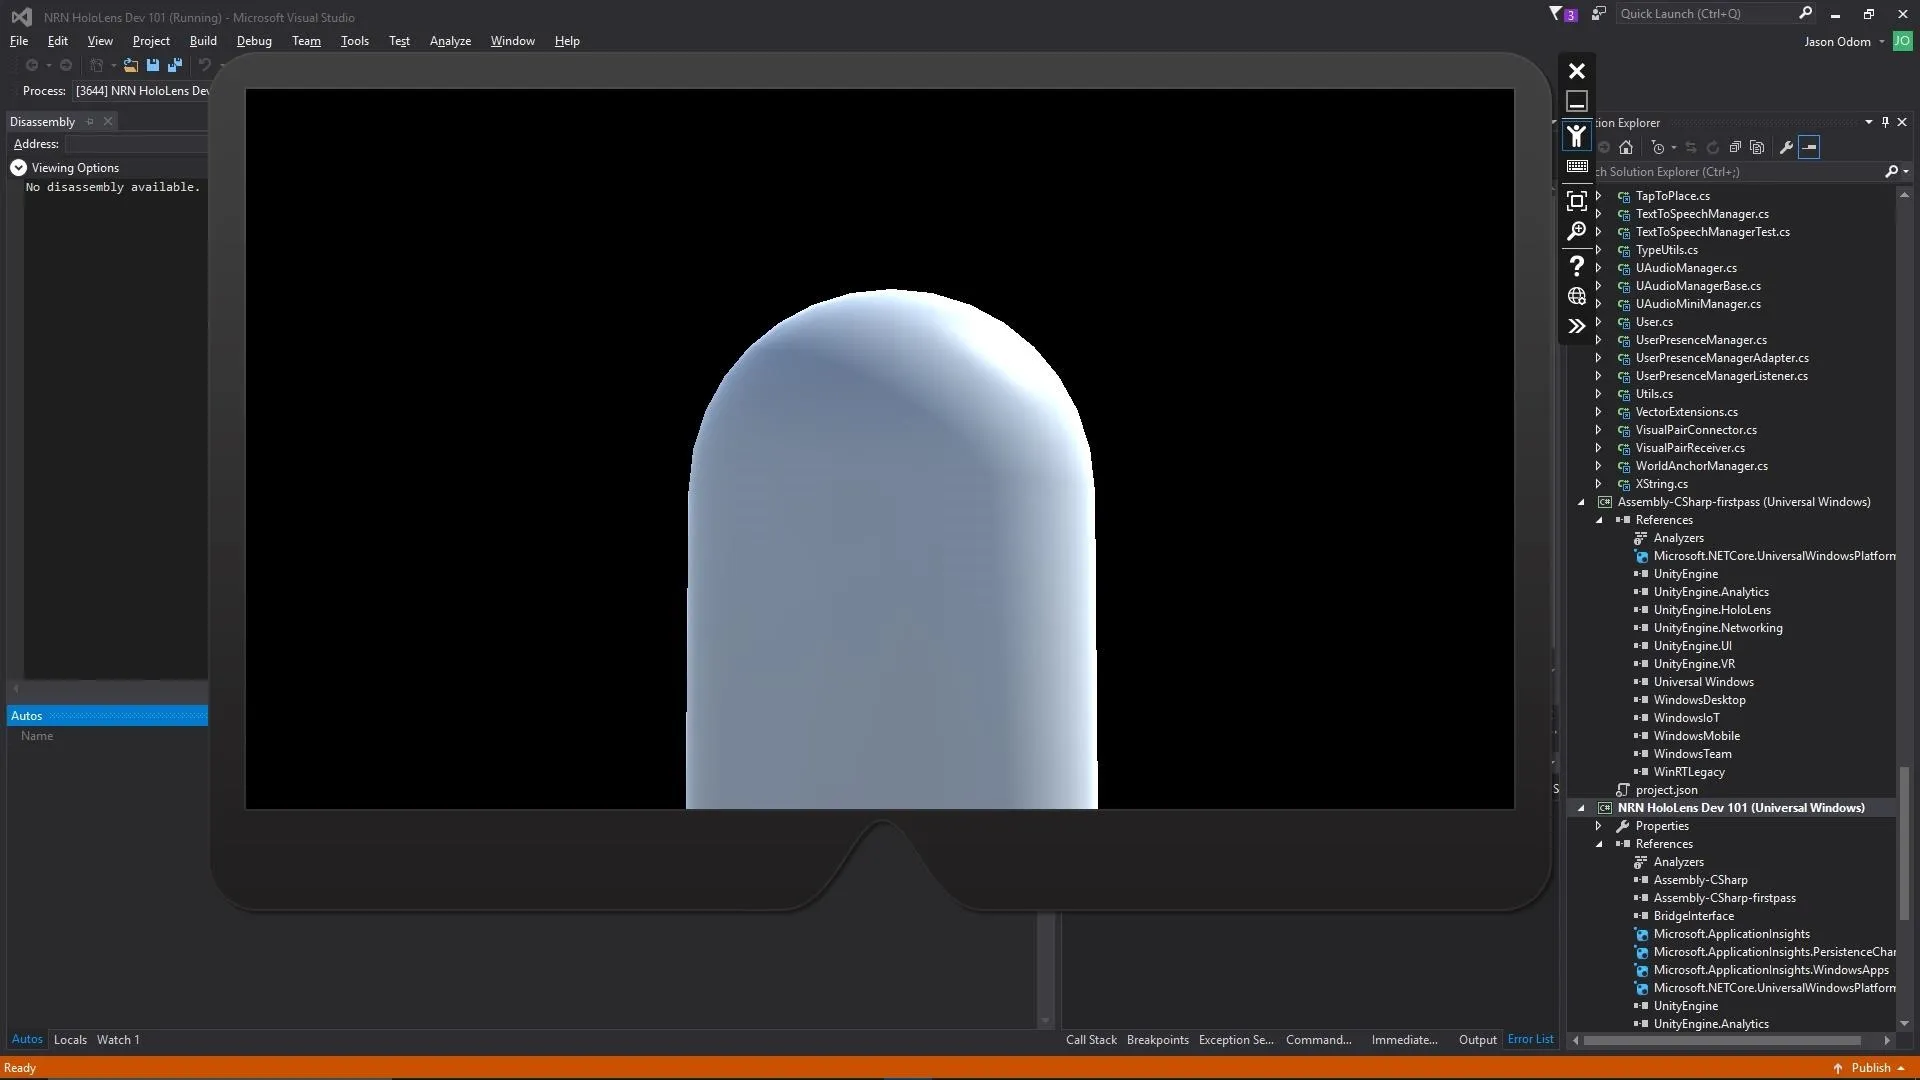
This is what it should look like right now:
Compile & Deploy
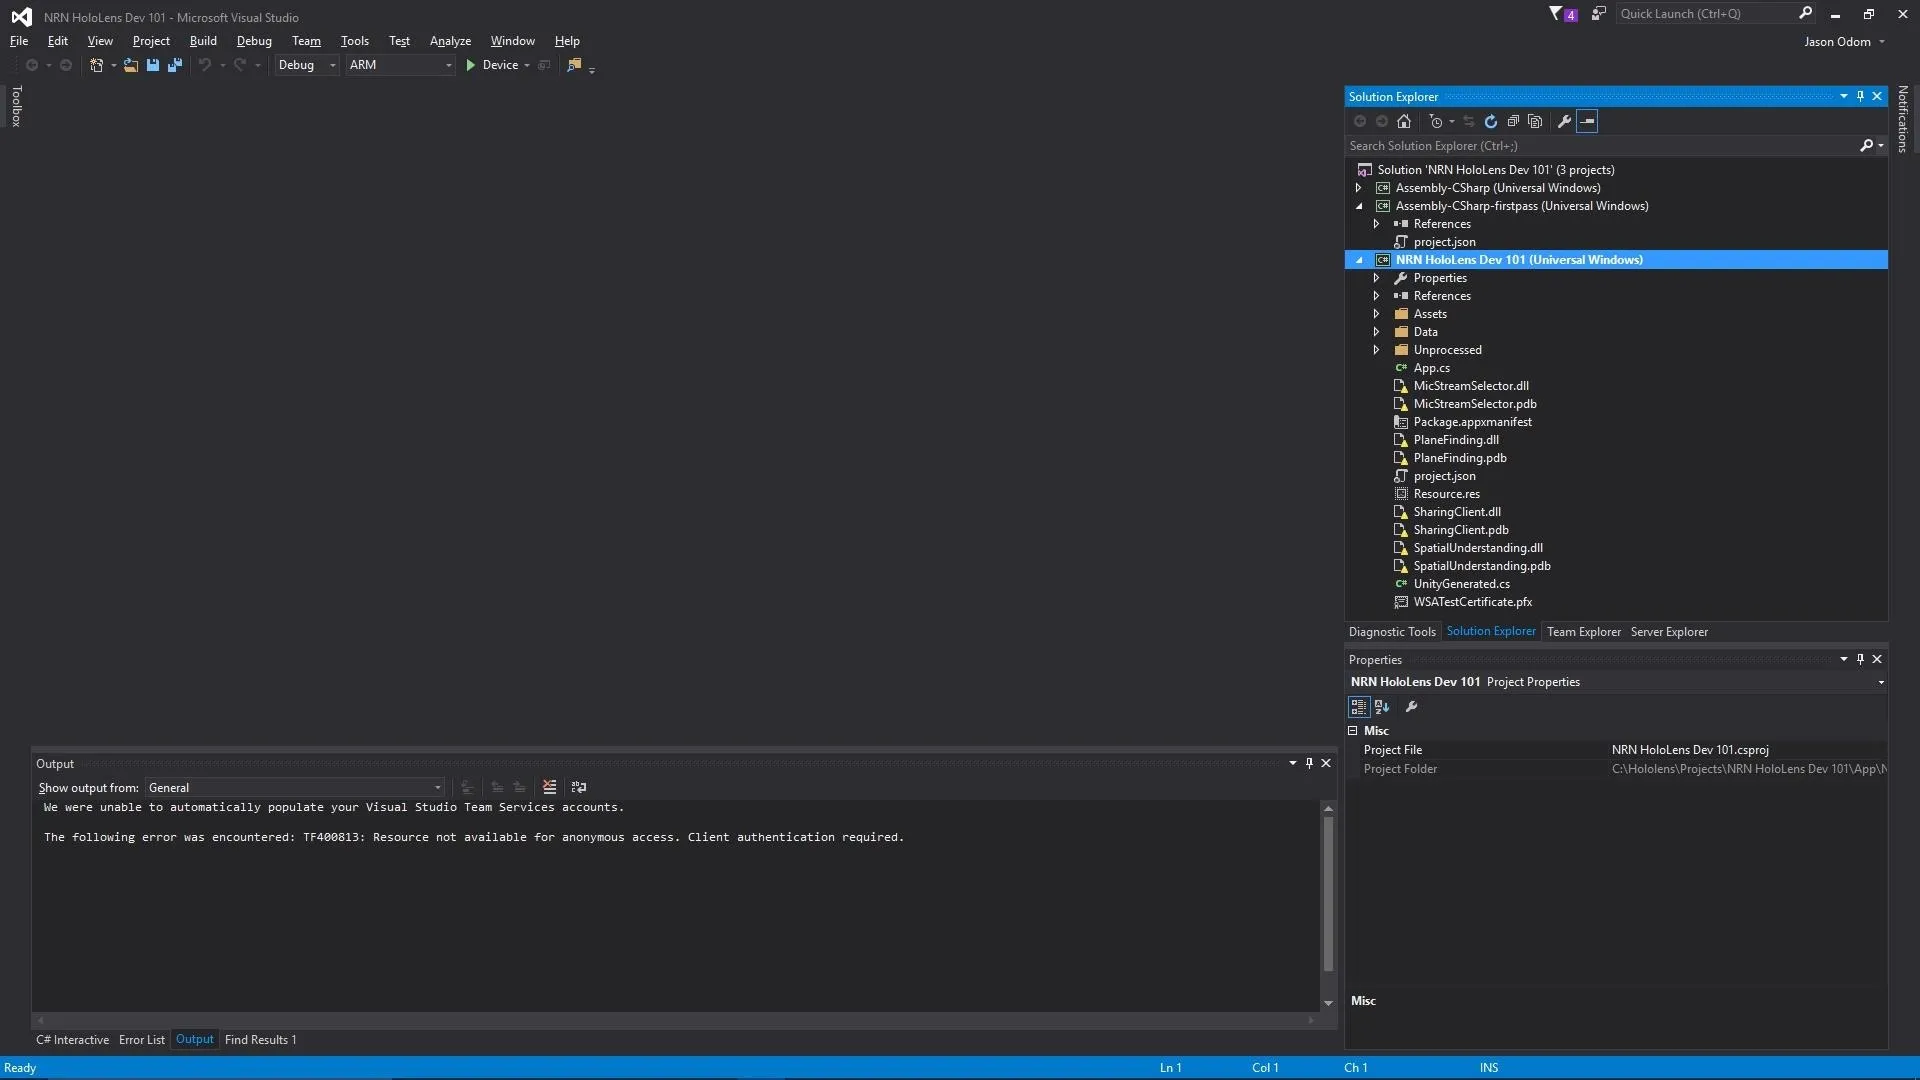
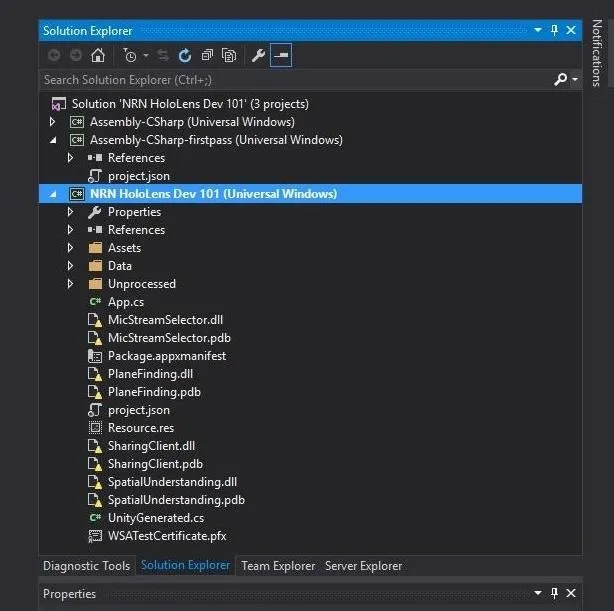
When Visual Studio has loaded up our project, we can see all the files in the Solution Explorer on the right. It appears to have changed in recent builds, but just in case— make sure the third solution in the Solution Explorer is selected (NRN HoloLens Dev 101). You will have two Assemblies, and then your third, which is the proper project.
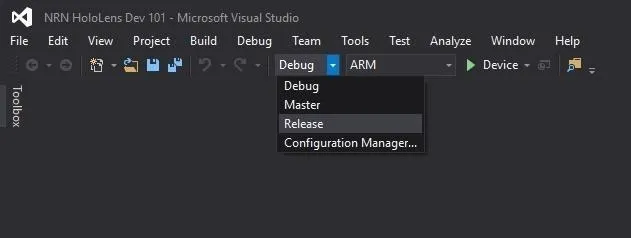
Now go to the "Debug" dropdown in the toolbar and select "Release."
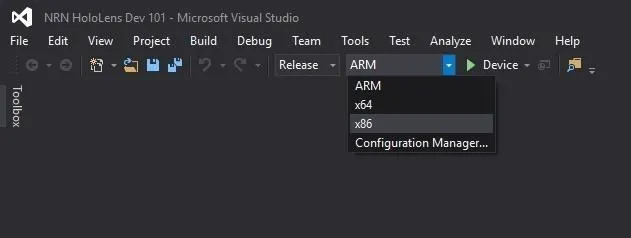
Click on the "ARM" dropdown and select processor "x86" since that is the processor the HoloLens uses.
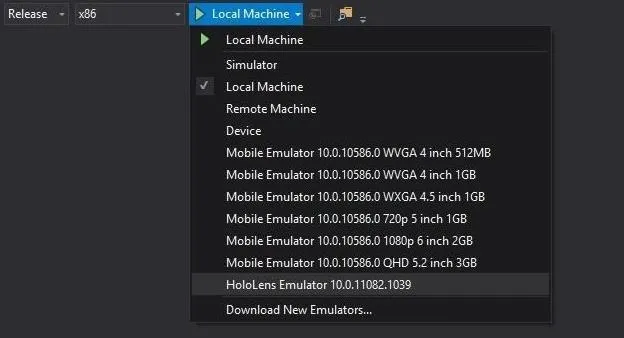
Select the "HoloLens Emulator" as our target device. If you have the HoloLens, you could select "Remote Machine" instead and choose your HoloLens.
Click the green play button right next to those dropdowns in the toolbar, and watch it go to work. The program will go through the compilation process, load the HoloLens Emulator, deploy the app, and run the app on the HoloLens.
Once it is loaded, you can use your mouse to move around and look at the various objects we placed for our test.
Pretty Easy, Right?
Congrats, and welcome to your very first running HoloLens program. May it be the first of many. If you want to just create a blank project in the future, you can just follow this how-to but skip Steps 5 and 6.
As I've already mentioned, we'll be diving into Unity in a future tutorial now that you've at least played around with it a bit, so stayed tuned for that one here on NextReality.
- Follow NextReality on Facebook, Twitter, and YouTube
- Follow WonderHowTo on Facebook, Twitter, Pinterest, and Google+
Screenshots by Jason Odom/NextReality


Comments
Be the first, drop a comment!