So after setting everything up, creating the system, working with focus and gaze, creating our bounding box and UI elements, unlocking the menu movement, as well as jumping through hoops refactoring a few parts of the system itself, we have finally made it to the point in our series on dynamic user interfaces for HoloLens where we get some real interaction.
It's now time to make our objects move, scale, and rotate in response to input from our menu. In a lot of ways, this whole tutorial series front-loaded a lot of the hard work to make the back-end easy. So easy that it virtually comes down to this line:
HostTransform.position = Vector3.Lerp(HostTransform.position, HostTransform.position + manipulationDelta, PositionLerpSpeed);
Back in July, when I start re-planning this series out, I started this part using the HandDraggable class from the MixedRealityToolkit. It's a robust class that takes into account quite a few factors and a ton of math to pull off the movement. I didn't like how it was coming out as a lesson, so I decided to try it a different way.
Some of the HandDraggable setup is still in there, because why reinvent the wheel? Am I right?
In your Unity project, select the "Move" subobject of TransformUITool in the Hierarchy window and click on the "Add Component" button in the Inspector. Select "New Script," then type MoveTool and hit the "Create and Add" button. Then double-click the MoveTool field that appears in the Inspector to open up Visual Studio.
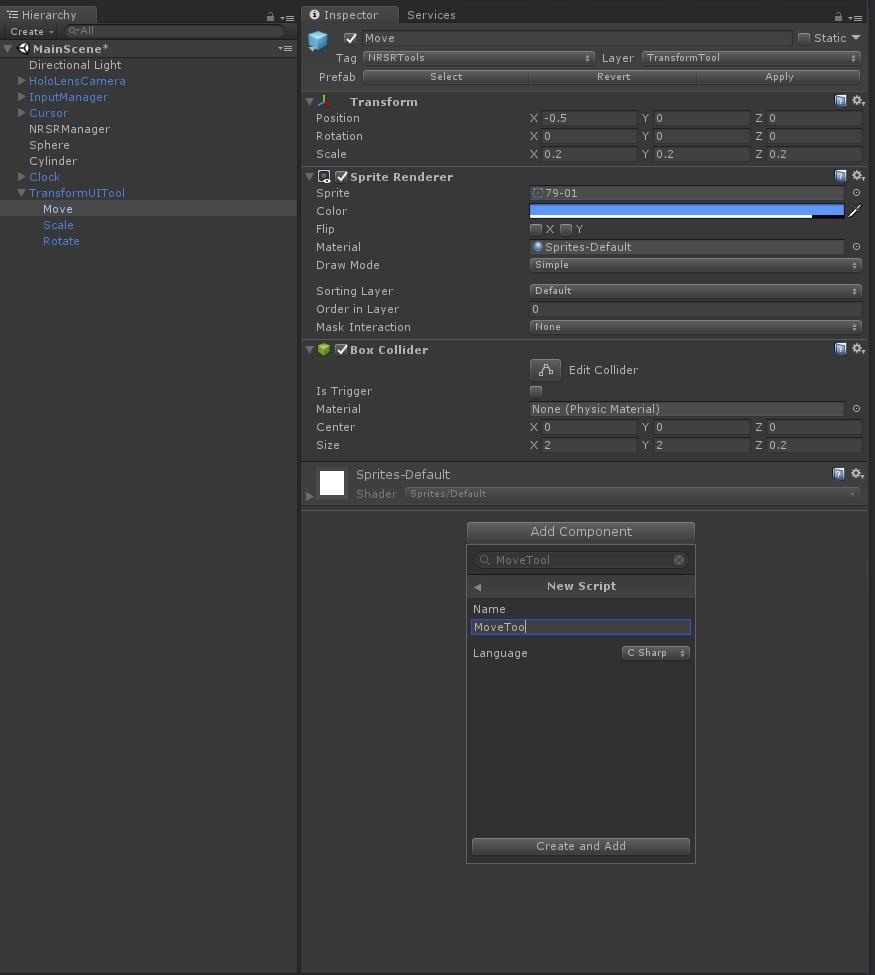
So the rest of what you will see in this lesson is all code from the same class. Either type it in as we go or copy and paste from our Pastebin file. Once that's out of the way, we can go over it piece by piece.
You may notice in the class declaration out past MonoBehaviour that there are a few interfaces much like we used in part 3 of this series. The difference is that this time we are implementing a number of interfaces.
- IFocusable: This one we know about already as we've used it in conjunction with delegates and events to do a number of things throughout the code.
- IInputHandler: This interface implements a simple pointer-like input.
- ISourceStateHandler: This interface handles changes in the source, for example, when the hand moves out of view.
- IManipulationHandler: An interface to handle manipulation gestures. This is the one that was not used in HandDraggable, but it does most of the work for us.
You may notice the attributes [Range(0.0.1f, 1.0f)] on a few of our properties. These will draw a slider bar in Unity's Inspector. A very useful way to limit choices. Beyond that, we have the normal selection of bools, floats, Vector3s, and GameObjects with a new addition, IInputSource. The latter can be a reference to anything a user would use to interact with a device.

In our Start() method, we set our transform to HostTransform. This is temporary. Due to the timing of when the NRSRManager will be ready, there are situations that allow this class's Update to run before the NRSRManager is ready, which would cause a null exception.
Then we set out Camera.main to the property mainCamera.
In the Update function, we check to see if NRSRManager has a focused object, and if it does, we set our HostTransform to be that object. See, I told you it was very temporary.
Then we test to see if IsDraggingEnabled is enabled, which it should be by default, and if isDragging is true, then we run that line of code posted in the intro above.

See, it's a really simple class. We Lerp the object from its current position to its position plus manipulationDelta at the rate we set in the inspector. So how do we set isDragging to true, and where does manipulationDelta come from, you ask? Well, that's where the rest of the code comes in.
StartDragging() and StopDragging() are simple catch-and-release traps that check a couple of bools, much like we have done in the past, and if those conditions allow us to get through, then we set our:
NRSRManager.holdSelectedObject_USingTransformTool
StopDragging() also acts as a reset by setting out currentInputSource to null.

Now we are getting into interface implementation. And to start with, we have OnFocusEnter and OnFocusExit. This is doing nearly exactly what it has done in the past for us. Simply put, they are helping us set states like StartDragging and StopDragging, with the end result, in this case, being that isGazed is true or false.

OnInputDown is the first of the IInputHandler functions. It checks a few flags, of note, it checks that we are getting positional information from our source, which is important for our purposes.
If we make it through the minefield of bools, we are now in a isDragging = true; We grab references to out InputSource and run the StartDragging() method.

The other IInputHandler method is OnInputUp, which if the currentInputSource is not null, then we StopDragging(), which sets it to null.

The thing about interfaces is that while you have to implement a function in its contract, what you do with it is completely up to you. In the case of ISourceStateHandler, we have no use for OnSourceDetected, so while the method is there, it is empty.
On the other hand, with OnSourceLost, we again test for currentInputSource, and if it is not null, then we run StopDragging() again.

And finally, we are at IManipulationHandler, which has four methods to implement instead of the traditional two we have seen thus far. And while you might get a little nervous looking at the code, really, it's simple.
- In both OnManipulationStarted and OnManipulationUpdated, the first code block is a simple debug statement that outputs information to Unity's console. This is information that I have found useful in seeing what is going on with the eventData.
- In OnManipulationStarted, we set out class variable manipulationEventData to be equal to the eventData.CumulativeDelta coming in.
- In OnManipulationUpdated, we set a local variable delta to be the eventData.CumulativeDelta minus our manipulationEventData. Creating a delta of delta information.
- Then we set our class field manipulationDelta to be the delta multiplied by DistanceScale. This is the last piece of our movement algorithm from the beginning.
- DistanceScale is a float we can set in the Inspector, but have defaulted to 8.
- Lastly, we set our class scope manipulationEventData to be equal to eventData.CumulativeDelta again, so that we have a frame of reference for the next update.

- Finally, we have OnManipulationComplete, where we set our two Vector3 variables to Vector3.zero or 0,0,0.
If you want to have some unpredictable but harmless fun, comment these two lines out and run the app.

Again, as linked above, you can copy all of this code from the MoveTool.cs file on Pastebin. If you have any questions on anything here, be sure to hit up the comments below.
Next up in this series, we'll be dealing with scaling and rotation, so stay tuned.
Just updated your iPhone? You'll find new features for Podcasts, News, Books, and TV, as well as important security improvements and fresh wallpapers. Find out what's new and changed on your iPhone with the iOS 17.5 update.









6 Comments
Hi, I've gotten up to this point in the series, but was wondering exactly how the object is supposed to move? After implementing everything above, it doesnt seem to be acting any difference than in Part 8. I tried both in unity game view and on the hololens, but I can't actually interact with any of the UI elements. They just appear and follow when focused on an object (yes, the MoveTool script is on the element). In the hololens, the objects are also not anchored
Step 1:
to the world and follow my gaze
Also, I get several errors relating to several of the scripts in the InputManager (Input Manager, Gaze Manager, etc.) stating that "Trying to instantiate a second instance of Singleton class GazeManager. Additional instance was destroyed". Seems to be steming from CreateBoundingBox()
Thank you
Let me think on this, but my guess is that the Singleton issues you mentioned are the cause of your issues.
As most of this tutorial was created during a very confusing time in terms of MRTK versions and Unity versions, I will put up a GitHub repo with the last build I have and maybe we can hunt down the issue.
If you would like you can contact me at jasonodom23@gmail.com
After going through a few version of Unity(I have about 8 installed on my main machine) and versions of the MRTK I am able to recreate the singleton errors. It appears to be relative to nearer updates to the InputManager. I will dig into that as soon as I can. And as soon as I have it figured out I will upload it to GitHub as I mentioned.
Hi! Do you know if this tutorial fully works with Unity 2017.2.1p2 and MRTK 2017.2.1.0? I managed to make it work until Part8, but I'm stuck right now with the TransformUITools object looping in a translation toward the Camera. I also noticed that the "BoundingBoxATS ActivateThis" line in the console is getting crazy, among others.
I can't wait to see the repo with your last build to test it! :)
Hi, I had the same errors and they originate from the bounding box class, especifically where creating copies of the objects with a Renderer component. Turns out that some 'default' scene objects like camera and some children of InputManager have a Renderer and they fall in the list that we loop through. I worked around the issue by tagging those components and checking whether they have this tag or not before making the copy. I don't think it has anything to do with the MRTK. Cheers!
Do you mind posting how you implemented this?
Share Your Thoughts